Configuring the Wevolor device
Wevolor version: 5.4.1
The ‘Wevolor’ (referred to hereafter as ‘Wevolor’, or
‘device’) is software running on a small microprocessor board (ESP32). It is paired securely with a messaging server ('server') which can take commands from a variety of sources. Assuming the main use will be from Amazon Echo ('Alexa') or Google Home users, it
utilizes 'If This Then That' ('IFTTT').
The Wevolor connects to the Levolor Premium 6-Channel Remote Control (‘remote’). If configured correctly the Wevolor can take (via IFTTT) Google Home or Alexa commands such as “Alexa, close the
blinds”, or timed commands like closing the blinds at sunset and opening
them at 6am. Those commands are then relayed to the remote to execute the action.
Before you start:
If you wish to use Alexa or Google Home, you should have an IFTTT Account.
You should have
a Levolor 6-channel remote which is paired with one or more blinds
so you can successfully open and close the blind(s) using the
remote. Make sure the remote has good batteries and is physically close (within 10 feet) of your Wevolor.
If you have multiple remotes, and wish to name the specific one to use, you will need to install the Levolor app on your phone, name the remote, and ensure you can send commands to the blinds from the app.
Note: The Wevolor only works with the Levolor Premium 6-channel remote.
1) Setting Up your Wevolor:
Configure the Wevolor to connect to the WiFi and the remote, and optionally to the messaging server.
Power the device by connecting a USB power supply to its micro-USB connector. The supply should be good for at least 1A @ 5V.
Devices usually have a dim constantly flickering blue LED or a red LED - this shows
the board is powered.
Check the bright blue LED on the board is on. The bright blue LED signifies the board
is in ‘setup mode’. If this is your first time powering your Wevolor and the
bright blue LED is not solidly lit, you may need to reset the device using
the reset button (typically labeled 'reset', 'rst' or 'EN') on the device itself, or by removing and reconnecting power.
Note: If you built you own Wevolor the blue LED may not light.
Setup allows for testing and setting (see 'Other Settings' below) other LED pin numbers and the correct polarity.
A WiFi network
('access point') is served by the Wevolor to allow setup.
On a phone or computer, connect to the 'Wevolor' WiFi network.
Password is 'setupmode'. Note: It may takes a minute or so for the
WiFi network to show up in the available networks list on your phone
or computer, if it’s not there, wait a minute.
Once connected to the Wevolor WiFi. Type '192.168.4.1' into your browser.
A 'Configure your Wevolor' page should be presented.
IMPORTANT: The unique 16-character (made up of 0-9 and A-F characters) identifier for your Wevolor should be
noted. It is needed when sending commands, setting up IFTTT and for accessing the myWevolor website.
Configure the following sections:
WiFi - select from the dropdown where the WiFi networks available are shown in order of signal strength. Choose
a network that is 'Strong' or 'Ok', and is 'Secure'. Networks shown as 'Unsafe' have network security settings that are
not recommended. Alternatively, enter the SSID (name) and Password of your home 2.4G WiFi. Note: ESP32 boards do not support 5G WiFi.
Both have a maximum length of 31 characters. The
password is shown as you type it, but you are the only one who can
see it. It's important you get the SSID and password correct, so
double check. The performance of your Wevolor is highly dependent on a strong and stable WiFi connection.
Levolor Remote
Name - If you
have only one remote you can leave this blank. If you have more
than one you can specify which you want the Wevolor to connect to.
The name should match exactly the name the remote was given in
the Levolor phone App.
Group - Set
what blind group or groups you want to open and close.
These are the same as the 6 numbered buttons on the remote.
Default is Group 1.
Additional Security
Send To Server - uncheck this if you want your Wevolor to be on your local WiFi network only. See the '...stay on my local network...' section below for details of how your Wevolor can be used when this is unchecked. Note: The following two options are irrelevant if this is unchecked.
Send IP Address - if checked the IP address of your Wevolor is sent to the server so the myWevolor web pages can find it.
If unchecked the IP address is not send, and you will need to find it yourself and type it into the myWevolor 'Local Status and Command' page.
Security Phrase - if provided, any set commands (see Steps to connect IFTTT below) will need to include the security phrase. This adds additional
security beyond the 16 character unique identifier. The Security Phrase can be anything but is limited to 31 characters.
Other Settings: LED Pin - allows Wevolor users who loaded their own ESP32 board to set and remember the correct LED Pin
(the 'Blight Blue LED' mentioned throughout these instructions) and polarity. Only change this if the blight blue LED doesn't light during setup. Enter a number such as 2, -5 or -22 (three common values for the LED pin) and hit the test button. If the correct value, the blue LED will flash slowly and go off.
The '-' sign says the LED pin is active low (set it off and the LED comes on). If the LED flashes and stays on, the pin number is correct but the polarity wrong. Add or remove the minus sign and retest.
'Submit' the
form with the green button. A red 'RESTART' button will appear. If
you are happy with your settings, hit the RESTART button to apply
your configuration.
Close the browser window or tab, as configuration is now complete. The bright
blue LED should now be off, and there should no longer be a 'Wevolor'
WiFi network available.
You can check whether your Wevolor connected by going to https://wevolor.com/myWevolor and entering
your unique 16-character identifier(UID) and Security Phrase if you set one. If status pops up then your Wevolor connected to the server and is configured correctly.
At this stage the 'set' and 'acknowledge' will be blank since no commands have yet been sent.
2) Sending commands to your Wevolor
There are multiple ways to do this. Click on the ones below that you want.
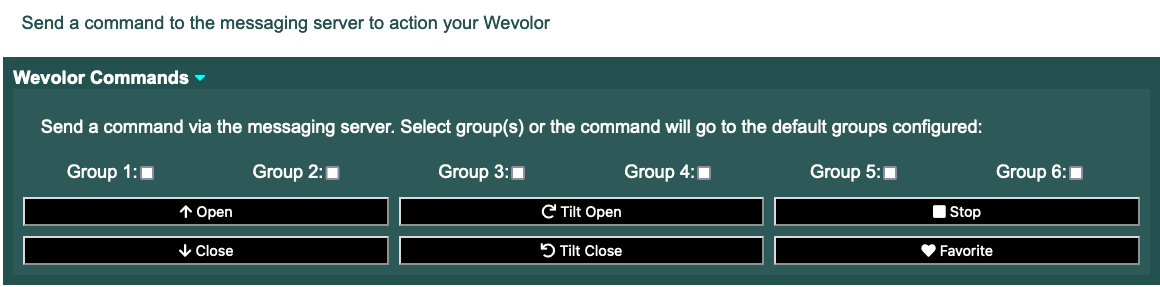
I'll send commands from the myWevolor page:
The myWevolor web site
This is the simplest way to send commands to the device. It's probably worth using just to test your Wevolor is operating properly, even if you intend to use Alexa etc. mostly.
No need for IFTTT for this. Simply go to https://wevolor.com/myWevolor and enter the Unique ID of your Wevolor, along with the Security Phrase if one is set. You'll see a section called 'Wevolor Commands'. You can send your Wevolor commands from here directly via the messaging server.
I'll send commands from Alexa or Google Home:
You'll need IFTTT to handle the commands and send them to the messaging server.
Steps to connect IFTTT
Go to the IFTTT web site or Download the IFTTT app on
your phone. If you don't already have an account, sign up for free.
IFTTT has 'triggers' (this) and 'actions' (that). Using Alexa as
the example, a voice command "Alexa open the blinds" is our trigger and
the Wevolor activating the remote is the action.
On the IFTTT web site, click the 'Create' menu item taking you to a 'Create
Your Own' page. Click on 'This' and select the Amazon Alexa service or your
preferred service such as Google Assistant etc. Follow the steps to configure
IFTTT to access your account, and set your specific trigger. For example, with
Alexa the trigger can be "Say a specific phrase".
Next click on 'That'. Wevolor uses the 'Webhooks' action service. Click
on it and select 'Make a web request'. This is where the unique 16-character
identifier you noted earlier comes in. Let's assume it was '00112233AABBCCDD'.
The URL field should be set to 'https://do.wevolor.com:9443/set/00112233AABBCCDD/open'
to open the blinds. 'https://do.wevolor.com:9443/set/00112233AABBCCDD/close' would be
the URL to close the blinds. Make sure you use your Wevolor's unique 16-character
identifier and the correct action. Also note that alpha characters in the identifier are always upper case, and the actions lower case.
Wevolor supports 'open', 'close', 'tiltopen', 'tiltclose', 'stop' and 'favorite'.
Note: if your blinds/shades operate with the left and right buttons on the remote then use 'tiltopen' and 'tiltclose' rather than open/close
To override the default group(s) that commands are sent to, simply
add a '/' followed by the group numbers to the end. Examples: Adding '/12' will execute the command on groups 1 and 2, or adding '/123456' would execute on all six groups.
Multiple Wevolors can be 'set' with a single command if required. Add additional 16-character identifiers to 'set' commands
separated by a '+'.
For example 'https://do.wevolor.com:9443/set/00112233AABBCCDD+22446688AACCDDFF/open' would send the open
command to two Wevolors.
As well as the actions listed above, additional ones are 'toggle' and 'tilttoggle'. Sending these will open (or tiltopen) your blinds if previously closed and
vice versa. Note: If toggle is used before an 'open' or 'close' command is set, it will initially open your blinds. Toggle
allows a single IFTTT action to be set up which both opens and closes your blinds (handy since IFTTT only allows
five applets to be configured without paying for a Pro account). 'tilttoggle' is similar but toggles between tiltopen and tiltclose.
Other fields:
Method must be left as 'GET' if there is no Security Phrase set on your Wevolor. It must be 'POST' if a Security Phrase is set.
The Content Type should be 'text/plain'.
The body will be left blank if no Security Phrase is set. It should be your Security Phrase exactly as you typed it in the Wevolor setup,
between a <<< and a >>>. Example, if your Security Phrase was set as 'I l0ve Wevolor!' the body will be <<<I l0ve Wevolor!>>>.
Save. IFTTT should show you your new 'Applet' for example 'If you say "Alexa trigger
open the blinds", then make a web request'. Note the 'trigger' word in there. If you prefer
not to have that you can set a routine in the Alexa app to recognize "Alexa, open the blinds"
without the 'trigger' word.
Go ahead and say to Alexa "Alexa, trigger open the blinds" and your blinds should
activate.
Repeat for the other actions you wish Alexa to perform (close, tiltopen, etc.).
I'll send commands from my iPhone or ask Siri:
iPhone Shortcuts
Thanks to Wevolor user Jeff for sending me information on this.
No need for IFTTT for this. On your iPhone or Mac find the 'Shortcuts' app.
- Create a new shortcut and name it something like 'Open Kitchen Blinds'
- Click 'Add Action', and you'll see a category of 'Web'. Click on that.
- Select the action type 'Get Contents of URL'
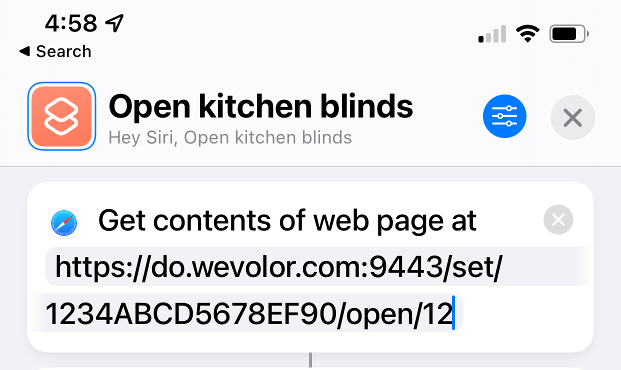
- The URL to enter is the one for the messaging server. It should be of the form: https://do.wevolor.com:9443/set/UID/action/groups where:
UID - This is where the unique 16-character
identifier you noted earlier comes in. Let's assume it was '00112233AABBCCDD'.
This should be set to 'https://do.wevolor.com:9443/set/00112233AABBCCDD/open'
to open the blinds. 'https://do.wevolor.com:9443/set/00112233AABBCCDD/close' would be
the URL to close the blinds. Make sure you use your Wevolor's unique 16-character
identifier and the correct action. Also note that alpha characters in the identifier are always upper case, and the actions lower case.
action - Wevolor supports 'open', 'close', 'tiltopen', 'tiltclose', 'stop' and 'favorite'.
Note: if your blinds/shades operate with the left and right buttons on the remote then use 'tiltopen' and 'tiltclose' rather than open/close
groups - To override the default group(s) that commands are sent to, simply
list the group numbers. Examples: Adding '/12' will execute the command on groups 1 and 2, or adding '/123456' would execute on all six groups.
Multiple Wevolors can be 'set' with a single command if required. Add additional 16-character identifiers to 'set' commands
separated by a '+'.
For example 'https://do.wevolor.com:9443/set/00112233AABBCCDD+22446688AACCDDFF/open' would send the open
command to two Wevolors.
As well as the actions listed above, additional ones are 'toggle' and 'tilttoggle'. Sending toggle will open your blinds if previously closed and
vice versa. Note: If toggle is used before an 'open' or 'close' command is set, it will initially open your blinds. Toggle
allows a single shortcut to be set up which both opens and closes your blinds. 'tilttoggle' is similar but toggles between tiltopen and tiltclose.
- Save it and it will appear in the shortcuts on your iPhone.
Once saved you can call it from Siri "Hey Siri, open kitchen blinds", or you can add automation to run the shortcut at a time of day, at sunrise or a list of other actions.
I'll stay on my local network and use 'Home Assistant', OpenHab or the like:
Home Assistant or OpenHab etc.
If you want to keep everything local to your home network and you configured the Wevolor to not 'Send to Server', the server will be unaware of your device and you will need to drive it locally. OpenHab and 'Home Assistant' allow for that, and there are probably others. The Wevolor publishes a local API for this case.
Local WiFi network API
The Wevolor publishes a simple application programming interface(API) on your local WiFi network. It is only accessible to other computers and devices connected to the same WiFi network. The API allows:
- Getting status of your Wevolor - http://{local-IP-Addr}/_status will return a JSON string with status. Optionally add '?log=1' to the end to also return the latest log information.
- Sending commands to the remote - http://{local-IP-Addr}/_command?action=close&groups=1 will send a close command to the group 1 blinds. Valid actions are documented above in the Alexa or Siri sections. If 'groups' is omitted the default groups from setup will be used. Note: unlike how groups are defined in the Alexa/Siri sections above, this is a bit field value between 1 and 63 (6 bits) for the 6 groups,
where: 1=group1, 2=group2, 4=group3, 8=group4. 16=group5 & 32=group6.
Examples:
- '&groups=9' would apply the action to group 1 and group 4 blinds (1+8).
- '&groups=38' would apply the action to group2, group3 and group6 (2+4+32=38).
- Update the code on the Wevolor - http://{local-IP-Addr}/_update?file=Wevolor/blinds_BLE_5_4_2.ino.lolin32.bin will load the 5.4.2 version stable code to your Wevolor. This takes 30 seconds to a minute, so wait until a success or failure response comes back. _status above shows the code version and modification (fix) level.
You can call the API directly from a browser, or it can be used when configuring OpenHab or Home Assistant. See documentation from those suppliers on how to call a URL endpoint API.
3) Once your Wevolor is Configured
Leave the Wevolor plugged in and physically close (10 feet or so) to the remote, and it should work well.If there is an issue, see ‘Troubleshooting’ below.
If the device is
connected to the WiFi and operational you can make changes by
navigating to https://wevolor.com/myWevolor and entering the unique ID of your Wevolor. See 'Other Useful Features' below for details.
Other Useful Features:
-
To access your Wevolor during normal operation, go to
https://wevolor.com/myWevolor and enter the 16 character unique ID of your Wevolor. If set you will also be prompted for the Security phrase.
Once the correct Unique ID is entered, status of your Wevolor will be shown (this is accessible anywhere):

-
The first panel shows the status of your Wevolor:
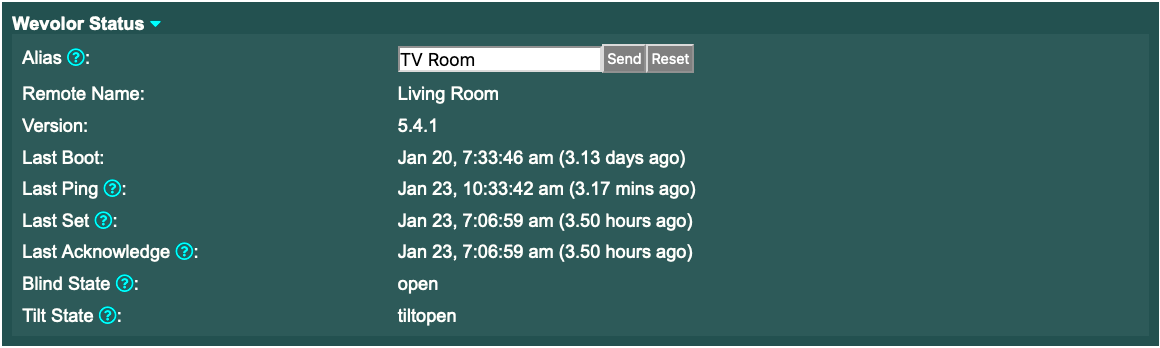
- The Alias is handy so you don't need to always remember the UID. Once set it will show up in the 'recent' dropdown.
- The Remote Name is the remote (name set in the Levolor app) this Wevolor will connect to. It's ok for this to be blank if you only have one remote.
- Boot Time and Last Ping show the 'health' of you device. It's normal for the device to boot periodically, but if it's booting ten times a day you might have a weak or unstable WiFi. Your device pings the server every 15 mins or so, so this value should be 15 mins or less.
- Last Set and Last Acknowledge are the last time a command was sent to the board, and how long it took for the board to action and acknowledge the command. It's normal for there to be two or three seconds between. If it's a lot more than that, the board may be having issues connecting to the remote.
- Blind State and Tilt State show the most recent open/close, tiltopen/tiltclose command received. This is used for toggle or tilttoggle.
-
The second panel allows you to sent actions directly to the messaging server. This is the easiest way to send actions as it doesn't require IFTTT etc.
-
The third panel has a link that allows you to connect to your Wevolor directly (only works if you are on the same WiFi network):
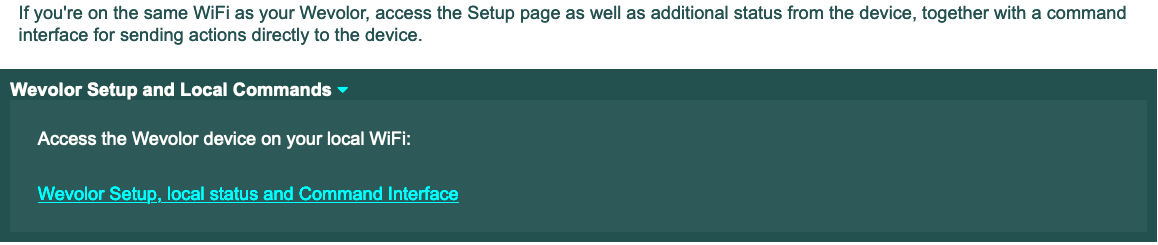
-
Clicking on 'Wevolor Setup, local status and Command Interface' takes you to a second page which connects directly to the device on your local network.
The first panel allows you to access the configuration page of the Wevolor (same as 'setup') and make changes. It also shows any updated code levels for you to load on the device.
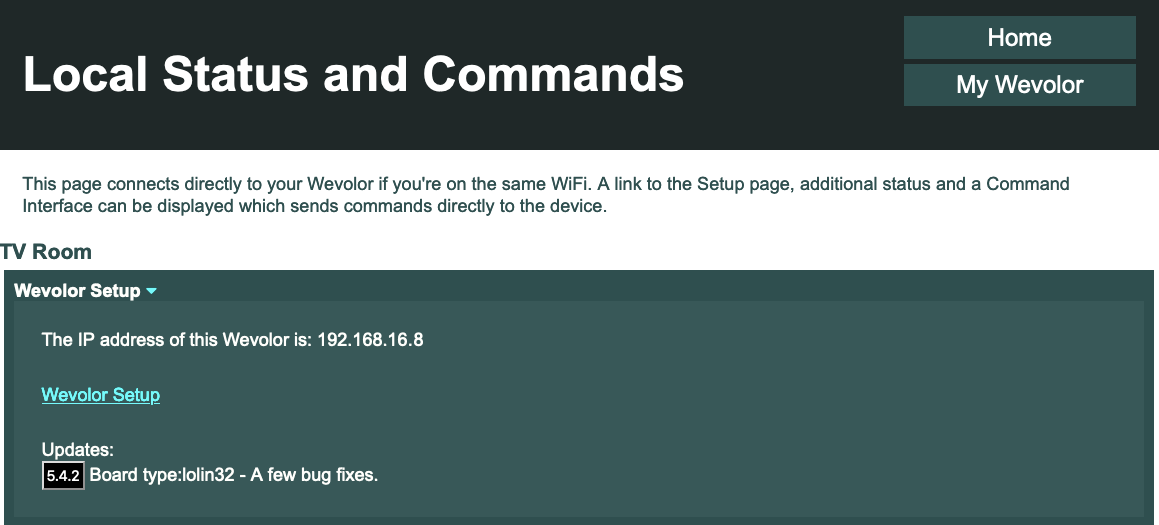
Note: If the IP Address was not send to the server (setup option) you will need to find the
IP Address of your Wevolor on your local WiFi network and enter it.
-
The second panel on this page has more detailed status direct from the board.
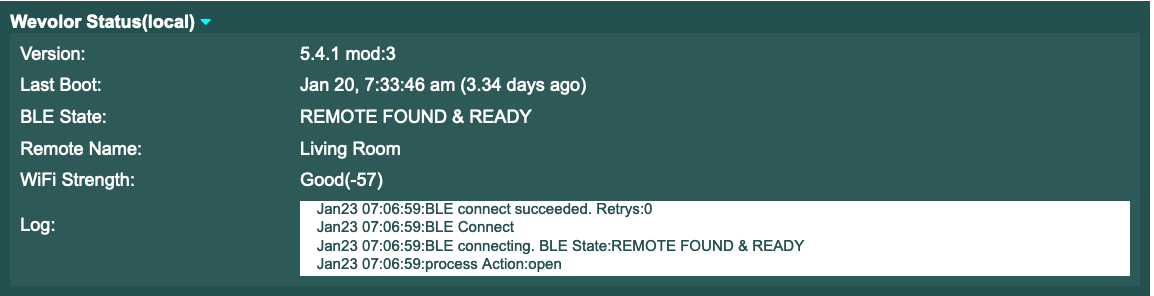
- BLE State shows the bluetooth connection to the remote. 'REMOTE FOUND & READY' is what you are looking for. BLE_INITIAL would mean the remote has not been found.
- WiFi Strength should be Good or Ok. If it's Poor or Bad consider moving the device closer to the WiFi router.
- Log gives detailed log entries from the device showing actions being performed etc.
-
The final panel allows commands to be sent to the board, similarly to the Command interface on the myWevolor first page. The difference being commands are sent directly to the device without the messaging server being involved.
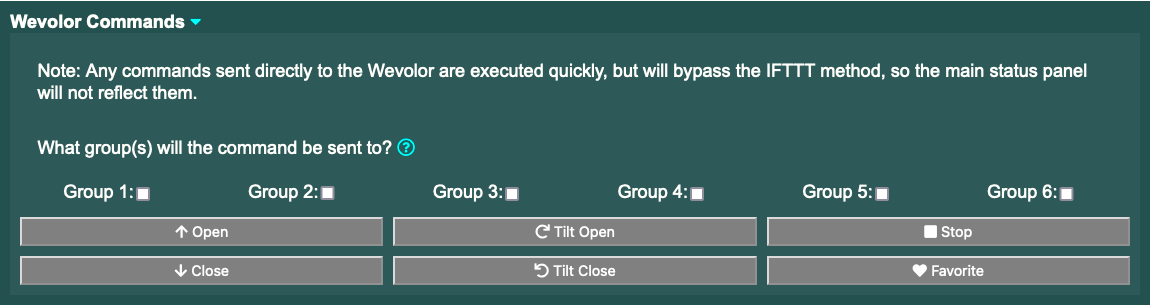
Because commands go directly to the device on your local network, the messaging server is not aware of activity so the set/ackowledge and toggle/tilttoggle states are not updated.
Troubleshooting:
The 'reset', 'rst' on 'EN' (Enable) button on the various board types will restart the board similar to removing power and reconnecting.
Version 5.4.1 and up allows factory-reset via the 'BOOT' ('001' on some boards) button which when held will flash the blue LED once per second. Hold the button for 20 seconds to factory-reset the device - blue light will turn solid-on showing returned to setup mode. For devices with no 'BOOT' hold finger down on the D04 (marked '4' on some boards) and that will have the same effect. Prior to version 5.4.1, the 'BOOT' button has no effect.
If you believe the device is properly configured, yet is not performing as expected, try restarting the device with the ‘reset’('rst', 'EN')
button.
If you still believe the device is not performing properly, please
take a look at the 'Wevolor Status' panel at https://wevolor.com/myWevolor (if not previously entered, you'll need to enter the 16 character unique ID and any Security Phrase set). On the lower panel, click on the link. If the link is not shown, or the command interface panels remain grayed-out, make sure
you are on the same local network as your Wevolor.
If you are on the same network, but your Wevolor is not being found, check whether the bright blue LED is pulsing every half second (remove the lid of the box if it's in a box). If it is, then the device is failing to connect to WiFi. Try moving the device to a stronger WiFi location.
If you think the WiFi details may be wrong you can factory-reset, or access the configuration (setup) page - see 'Other useful Features' for details - on the device to reset and re-enter the WiFi credentials.
If the Local Status and Commands page displays correctly then it is connected to the Wevolor. The Status Panel display the 'BLE State' (the bluetooth connection to the remote).
The ‘BLE State’ should be one of the following:
"BLE INITIAL" - the device has not found
the Remote. Move it physically closer – within 10 feet. Make
sure the batteries in the remote are good.
If you named the remote, make sure it exactly matches the name in the Levolor app.
"REMOTE FOUND & READY" – the Remote is found
and is ready to receive commands. This is the expected state if all
is well.
"REMOTE CONNECTED" – the Remote has received a
command and is executing it. The Wevolor will automatically
disconnect from the remote once the action is complete, in order to save
the remote’s batteries.
If your blinds are not responding check the remote is working properly by using it to
open/close. Also check the ‘group’ is set properly in the
Wevolor configuration or the command being sent.
Any other problems, please contact me via e-mail at
support@wevolor.com. Please send as much background information as you can,
and a description of the error.
Suggestions for features and changes are also welcomed.
Special Notes:
The https://do.wevolor.com:9443 website mentioned above sits on a cloud server. Your Wevolor links with that site to see if new
commands are available to execute. The advantage of this method is your Wevolor
stays safely on your local WiFi network with no special ports needing to be opened which
otherwise might be a security risk.
If for whatever reason the do.wevolor.com site is down, your Wevolor will not operate correctly. While every effort will
be made to keep the website operational, occasional outages can't be ruled out.
Also, your Wevolor sends information to the website for purposes of recording status, and developing/improving the Wevolor code. That information is limited to the last boot time of
the Wevolor (to understand how stable it is). No confidential
information (such as WiFi credentials) are ever sent or visible in any way to the
developer. An encoded version of your Wevolor's local IP address is send (so the wevolor.com/myWevolor page knows where to find your Wevolor) but that is only readable by the Wevolor code and is secure. If you are interested to view the information sent, go to
https://do.wevolor.com:9443/status/your-unique-16-character-Wevolor-id. If you want to know what the time numbers mean http://hghst.net
can help with that.
do.wevolor.com replaces hghst.net for sending set commands. While hghst.net continues to work its use is deprecated.
There's no membership or cost to running your Wevolor but if you feel inclined to help me pay for the website hosting etc. you can
 Buy me a coffee
Thanks, Roger.
(©) Copyright 2020-2021, Roger Hoggarth.